The lab is just around the corner and many of you will maybe experience lab work at the University for the first time. As with any lab, preparation will help you understand more and give you more out of the day at the lab. Therefore, Jørgen Høgberget has written this motivational note for the labs.
In addition, we encourage you to have a look at the lab texts that are published here.
General thoughts
The idea behind this note is to clarify the concepts introduced in the lab, as well as to tie the perhaps cryptic values and concepts to the more familiar ones in electromagnetism. Some important questions to ask are: Why are we interested in these values? Why are we performing the measurements, and what do they tell us?

The lab is just around the corner.
Electromagnetism is, like gravity, a fundamental force of nature. You may find gravity obvious; you feel it every day. It is what keeps you grounded. Electromagnetism, however, is slightly harder to wrap your head around; charge is less intuitive than mass! You are not surprised when an apple falls from a tree, but when a beam of water is bent in the presence of a glass rod, there is a more magical mood to it.
Is gravity what keeps your skin together, your bones from breaking, etc.? No. It is the charge of molecules, properties of atoms etc. A lot of the explanations to these things have their roots in electromagnetism. Electromagnetism is more than shining light, it explains a lot of the properties of i.e. the materials most of our modern technology is based on. This is the main reason why electromagnetism and lab-work go hand in hand.
Lab 1
We are all familiar with electronics. We were introduced to currents and potentials by adults telling us not to put our fingers in the electric circuits of our home. This is, at least to me, one of the reasons why the theory of electronics can be hard to grasp; we already have a picture of it! This is why it is very important to have an open mind when it comes to this.

The inner resistance in a voltmeter is not really caused by a resistor.
Exercise 1,2 and 4
Internal resistance. What a word. Take for example the voltmeter. Does it have a resistor inside it? Could we not just replace this one with an insulator and have perfect measurements? No, sadly this is not the case.
The voltmeter is a complex thing, however, it is a general theorem, called Thevenin’s theorem, which states that any resistive circuit or network, no matter how complex, can be represented as a voltage source in series with a source resistance.
It is this source resistance we are interested in. The complex electronics of the voltmeter sets up what is interpreted as a resistance by the current flowing in the circuit. It is big, but far from infinite, as this would block the voltmeter from working at all. It is therefore necessary to know the value of it, so that we can control that the error in our measurements are not too big. This goes for all measurements, no matter the field.
Exercise 4
The conductors you face in early level electromagnetism are \textit{ideal} in the sense that the current flowing through the material do not loose energy on the way in terms of heat.
At room temperatures in the lab, however, the circumstances are not ideal. The Peltier element exploits this concept of heat transfer by the so-called Peltier effect, where two different materials will transfer heat, or energy for that matter, between each other. This transfer is directly proportional to the current.
If we instead look at it the reversed way: We warm up one of the materials, and cool the other one. This way we induce a heat transfer. If the Peltier effect is reversible, this would imply that there is generated a current in the loop between these materials. It works like a battery! This is electromagnetism in the shape of thermodynamics!
Exercise 6
Superconducting is a phenomenon where electromagnetism acts really strange. This weirdness is much like what scientists discovered when studied the movement of atomic particles. This strange behavior is described (at least attempted) by the weird Quantum Mechanics. So prepare to see some quantum effects with your own eyes! (The Quantum perspective of Electromagnetism is called Quantum Electrodynamics.)
Lab 2
Magnets are fascinating objects. Have you ever asked yourself why we have magnetic fields? They are generated by charges, but so are electric fields. Why do we distinguish between them? To demonstrate this phenomenon, it is crucial to know that they are generated by moving charges. The relation between an electric and magnetic field is what triggered Einstein to work on his theory of special relativity. One interpretation of the theory is that the dynamics of moving objects gets corrections to make sure that the speed of light is not broken. See where I’m going?
If the next part confuses you, do not worry, it’s beyond the scope of this course!
Consider that you are observing a stationary charged rod while standing still. It’s electric field is given by Coulomb’s law, and the force on a test charge  in this field (from the Lorentz force) is
  .
.
However, let’s move to the left with a constant speed  . From our point of view it looks like the rod is moving. From theory we now know that a magnetic field is circling around the rod. But we didn’t do anything spectacular? This seems a bit too magical.
However, like the Lorentz transformations of time and position (i.e.  ), the Lorentz force is also invariant of whether or not the rod has a velocity from our point of view. This means that the second term
  arises as a relativistic correction to the field from the stationary rod! What you are seeing with your own eyes when you are doing this lab, and when you are guided by a compass for that matter, is the manifestation of special relativity!

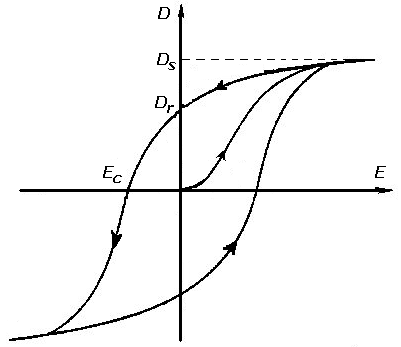
This is what an hysterisis curve looks like. In this lab you will make one of your own.
Exercise 1
Susceptibility, what a word. It is derived from the fact that the permeability  of a material is not equal to the one of vacuum
  . Working with
  and
and  are a practical way of using the equation
  . The ratio between the material’s permeability and the vacuum’s, is used as a measure for this difference:
  . (This quantity is called the relative permeability.) Since this ratio always stays close to 1, and in some interesting cases extremely close to 1, one usually tables the susceptibility
  (This can also be expressed as
  and can be viewed as a relative difference between the two permeabilities.)
In other words: It’s a convenient way of expressing how a magnetic field will be different in a “magnetic” material ( ) than in a non-magnetic one. Good luck!
Exercise 2
This exercise lets you use your knowledge about solenoids to measure the strength of a magnet. This way of measuring, by simply observing the effects the system of interest has on another system, is a grand example of the strength of physical laws. We can say something about the magnet without even touching it!\footnote{Imagine having to put a thermometer into the sun’s core to measure it’s temperature…} All we need is something to relate the behavior of the solenoid with the properties of the magnet, namely Faraday’s law: Beautiful!
Exercise 3
Ferromagnets, without the applied field these materials are not magnetic at all. However, when an external field is applied, the magnetic moments of the atoms inside line up with the field making it magnetic. The interesting thing is that it will stay this way unless we apply a magnetic field in the opposite direction to neutralize it. This behavior is called hysteresis. It is analogous to mixing acid and base in water.
Just like in the previous case, once the material is magnetized, it will alter the magnitude of a magnetic field inside it. The most common way of picturing how the magnetization of the material is altered by the application of a magnetic field is by drawing hysteresis loops. How to read these I will leave as an exercise for the lab, but I assure you it’s very insightful.
Lab 3
The Hall effect was discovered by the American Edwin Hall in 1879, around the same time Maxwell was working on his equations. 50 years earlier Gauss, Faraday and Ampere published their laws, laying the mathematical framework for the electromagnetism. It represents the perfect interplay between magnetic and electric fields, charges, (semi)conductors and potentials.
In the same way as in lab 2, we can determine the magnetic field (without touching the magnet) by predicting the magnetic field’s interaction with the semiconductor using physical laws. This method is called Hall probing, and is a commercially used method. Can you do lab 2 using this method? If so, which of the methods did you prefer?


