The oblig is here

The oblig has been posted on the course pages.

You can find it here under “Obligatoriske oppgaver”.

Please note that last weeks exercises included an oblig warm-up. This can be useful if you want to test yourself with a simpler problem before going ahead with the whole oblig.

In addition, you’ll find the note about Jacobi’s method on this page, under the link named “Numerical solutions of Laplace’s equation”.

You’ll find the due date in the oblig itself.

Good luck!

Electromagnetic java simulations

The java simulations that Andreas Görgen showed in the lectures can be found here:

The two first ones allows you to set up charge distributions and visualize fields, field lines and equipotentials. The third one comes with some preconfigured and interesting charge distributions where you can do things such as taking the flux integral of the field. As a recommendation for link 3 try out; setup: charged plate dipole, mouse: surface integral and see how you change the field by varying the the size of the plates. In one limit you get the familiar dipole field, while in the other you get the field from a parallel plate capacitor.

Using Mayavi’s contour3d function

The Mayavi library that we’re using in this years course holds a great amount of functions to plot 3D and 2D data. Among these is the contour3d function that is very useful to plot equipotential surfaces in 3D space. This could for instance be used to plot a potential. In the exercise set from week 3, you may use this to visualize the potential inside and outside a uniformly charged sphere.

The solution program for this exercise is shown below:

from numpy import *
from enthought.mayavi.mlab import *

x,y,z = mgrid[-100:101:5., -100:101:5., -100:101:5.]
R = 40
Q = 1.0

r = sqrt(x**2 + y**2 + z**2)
V = 0*x
for i in range(len(r)):
    for j in range(len(r)):
        for k in range(len(r)):
            if r[i][j][k] < R:
                V[i][j][k] = Q / (8 * pi * R) * (3 - r[i][j][k]**2/R**2)
            else:
                V[i][j][k] = Q / (4 * pi * r[i][j][k])

contour3d(x, y, z, V, contours=20, opacity=0.5)

Note that we are setting contours=20 to have 20 equipotential surfaces and opacity=0.5 to be able to see through the surfaces. Otherwise we would only be able to see the outermost surface. You can read more about these and other settings by typing “help contour3d” in IPython (after importing mayavi) or by looking at the online reference.

The result is shown in the figure below:

A close up of the potential from a uniformly charged sphere. The rings are spherical shells coloured according to the level of the potential. They are semi-transparent, so that you can see the inner shells (the orange is the innermost shell.)

Do you see how the potential rises and lowers quickly close to the edge of the sphere? The edge of the sphere is located approximately where the color goes from yellow-ish to green. What does this tell you about the field in this area?

Calculating the gradient in Python

The NumPy package in Python serves us with a huge selection of useful functions for working with all kinds of numerical problems. One such function is gradient(V), that takes in a mgrid based matrix V and returns three mgrid matrices for each component of the gradient.

For instance, if you have the electric potential as a function of x, y and z, you can use NumPy’s gradient function to find the electric field through the relation \mathbf E = - \nabla V. An example of this is shown below:

from numpy import *
from enthought.mayavi.mlab import *

x,y,z = mgrid[-100:101:25., -100:101:25., -100:101:25.]

V = 2*x**2 + 3*y**2 - 4*z # just a random function for the potential

Ex,Ey,Ez = gradient(V)
Ex = - Ex
Ey = - Ey
Ez = - Ez

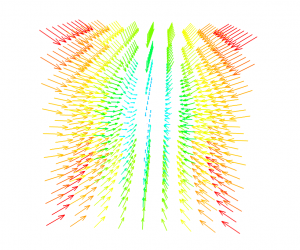
quiver3d(x,y,z,Ex,Ey,Ez) # plot the electric field just for fun

Note that this potential is random and not necessarily something you would find in a real electromagnetic problem. The resulting electric field is shown below:

The field generated from using NumPy's gradient function on our random potential.


Postponed lectures

Due to UiO’s 200 years anniversary the lecture last Tuesday had to be postponed and will be held tomorrow in “Store fysiske auditorium” replacing the  planed vector analysis lecture. The lecture on vector analysis will instead be held this Friday in room V329 where the subject will be flux and divergence.

On the concept of dipole moment

The dipole moment of a configuration of charges is an important concept in electromagnetism, but in most introductory texts it might seem like the dipole moment is only defined for two opposite point charges separated by a distance. This is however not the case. The dipole moment can be defined for any configuration of charges where the net charge is zero.

H20 is a polar molecule which means that it has dipole moment. However the H20 molecule is not just two point charges separated by a distance. So how do we then define its dipole moment? Source: Qwerter/Wikipedia

The dipole moment is also crucial in order to undersant how molecules and atoms are affected when they are placed in electric fields as well as understanding the phenomenon of “polarization” of matter.

If you want to learn more about why dipole moments are important and about its generality the following note might be of interest to you:


Lecture on Thursday September 1

The «plenumsregning» on Thursday September the 1st will be replaced by a lecture on Maxwell’s first equation, electric work and energy, as well as vector fields such as the gradient of electric potential.

On the next «plenumsregning» we will continue to go through vector analysis, moving on with flux and divergence. Due to the 200 year anniversary here at UiO we will need to reorganize some rooms. Because of this, we will announce the exact date for the «plenumsregning» as soon as we know where and when it will be held.

Animating plots and waves in Python using matplotlib

matplotlib is an amazing framework to do visual plots in Python. It compares well with GnuPlot and beats Matlab’s plotting abilities by having more features. Although it does lack some 3D support, you may simply choose a different framework for 3D plots thanks to Python’s flexibility . In which case I would recommend Mayavi as a superb 3D plotting engine which I have written about before.

But now, let’s have a look at matplotlib’s animation capabilities. The script below shows a very easy approach to animation in matplotlib. This results in an animation of the standing wave shown here:

The script is as follows:
Continue reading

Using binary data instead of text files in Python

It’s been a while since we’ve posted anything here. Sorry about that. It has just been too much to do lately to find the time to write new posts.

This post is also arriving a bit late to be useful for anyone this semester, but what it shows might be useful for others. Or maybe for someone taking the FYS1120 course at a later time. So I’ll post it here still.

In mandatory exercise 2 we needed to load a huge file containing data from an AM radio signal. This was available a Matlab file and as a text file with all the values on each row. Those of us using Python realized quite quickly that most of the time spent on this exercise went to load the data before performing any computations on the data.

However, in proper hindsight, I thought it might have been a better idea to save the file as binary data instead of as a text file. After all, binary data saves space and usually is a bit quicker to load.

Doing this in NumPy is extremely simple. Just load the text file data and save it back in NumPy’s binary format:

Continue reading